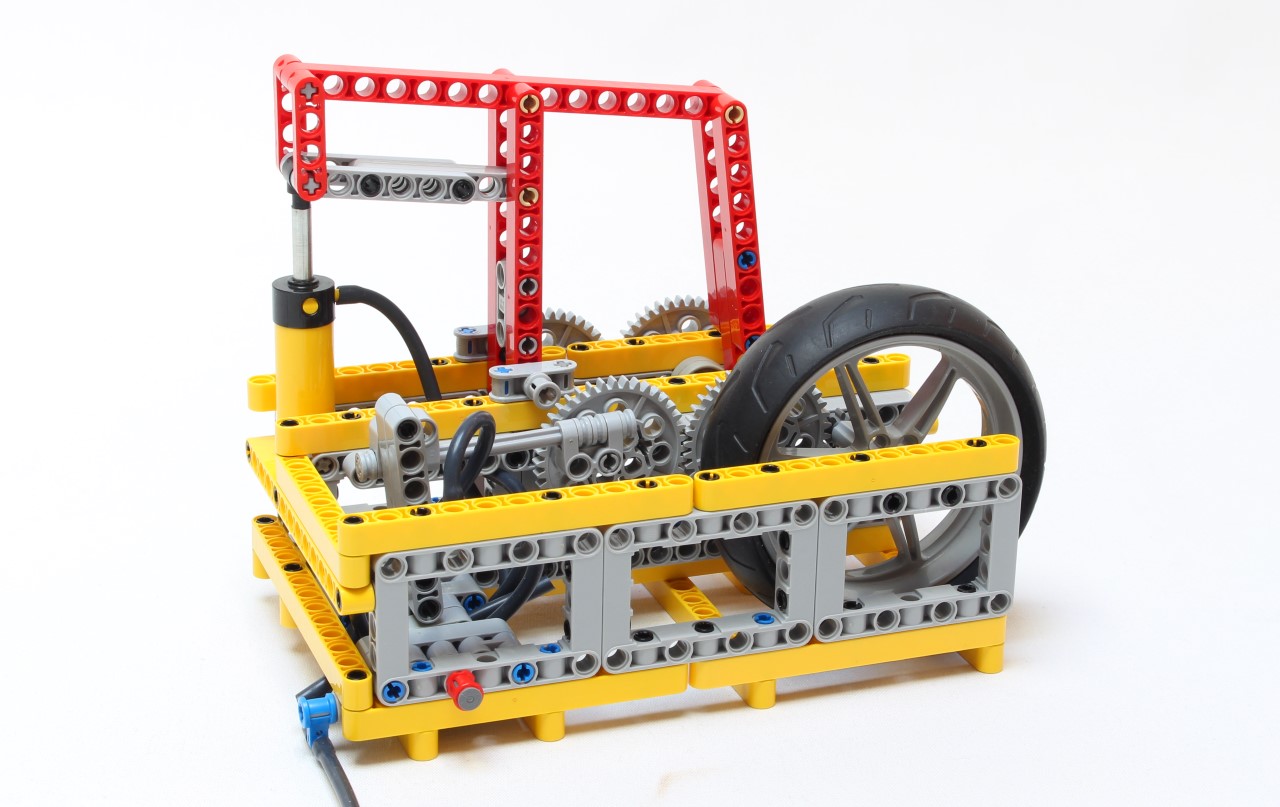
A switchless pneumatic engine mounted in a steam machine design.
A wanted for a while to test the switchless pneumatic engine, in order to continue my work about Lego Pneumatic Engine (LPE). The aim here is to not use the classic switch lego which has a poor dead point which blockes completely the air flow in middle position. This causes many stop during the functioning and a high needed force to overcome this dead point (therefore a big wheel of inertia).
The custom switch is based on work of DrDueNL which has made a brilliant work about switchless engine. The custom switch works as the same as the lego official switch. The swinging arm presses alternatively the input (chamber in pressure) and output (exhaust chamber) of each chamber of the pneumatic cylinder by pressing directly on the pneumatic hose. For example, at the right, the swinging arm pinches the hose connecting the lower chamber which causes pressure in it, and do not pinch the hose on the higher chamber which causes the exhaust of the airflow. The movement is repeated for each chamber alternatively. At the middle position, the airflow is blocked so it acts as a dead point which has to be passed as quick as possible (as on every Lego engine).
The ignition timing is controlled by the 40 tooth rotating and push the swinging arm. A little timing delay is needed but less than a classic lego switch. In order to prevent the slack of functioning, the mechanism is doubled with 4 40 tooth gears. But there are also a little gap between the two gearing by slightly twisting the axle and move back for on tooth. This configuration causes a little tension in the axle which overcome completely the slack of gearing which improve the efficiency.
Consequently, the engine runs smoother than an engine which lego switch. The custom switch enables to have free dead point which causes to work with low pressure and less friction (only two hand pump needed or a 3 pump compressor on a RC motor). Of course this solution is more imposant and bulky but the efficiency is way better.
I have created the building instructions has a detailed photo sequence in order that you can rebuild it.The engine needed no ajustement, just respect the timing delay as seen on picture and the trick about the 40 tooth gearing (not needed but better).


(9) Comments
Yes it is possible, if you place in with 180° layout, in order you power two chambers with a single switch mechanism. So you can put a T connection on the hose which connect the original chamber of the single cylinder, then each extremity of the T have an hose, and these hose are connected to the two cylinder in that way : pull chamber of cylinder 1, and push chamber of cylinder 2, and vice versa for the other T pneumatic hose.
is it possible to convert in to a 2 piston version?
Hello, you can find it on the Hot Bulb Tractor page. Here is the direct link to download the 2Mo PDF of the hand pump.
Hey, any chance at a parts list for the little hand compressor? It’s not in the rebrickable list linked in the article.
Thanks!
Great MOC and building instruction, works like a charm at first try.
Thank you for sharing your creation!
Hey Nico!
How about try to use the part “4692 Technic Pneumatic Distribution Block 2 x 4” , in the exhaust pipe to avoid lose of pressure in the system while in the dead point when both pipes are open?
Maybe with this you can use less pumps.
Conecting the exhaust pipe in inlet part of 4692 and the exaust of 4692 in the system again.
Just a idea, dont know if it will work.
Im trying to figure out how to make a valve more eficient without loose of air pressure.
How do I buy one of your instructions?
I assume not, because you need 4 of them to have correct gearing and placing for the functionning. 40t is very usefull in moc, so try to buy some of them on bricklink 🙂
Great moc nico! The first switchless engine with instructions in blog form!
I have only one 40-tooth gear… any advice?
Comments are closed.